Ignition Timing for Modified
Engines
![]()
An often neglected but important area when tuning an engine is the ignition system. No I don't mean harder plugs, competition coils, lumenition etc., that only affect the efficiency of the spark, but the actual ignition advance supplied by the distributor. Tuned and modified engines have different advance characteristics and requirements from a normal engine. Adapting the advance curve to meet these requirements using the standard mechanical distributor is not that difficult a task once it is understood. This area is often considered to be a black art, but it is actually quite straightforward.
Correctly setting the advance curve for a modified engine can make a considerable difference to the tractability of the engine as well as ensuring that the engine is giving of its best power wise.
Modifying the advance in the way described can only be done on an engine that uses mechanical advance. Some engines use mapped ignition which is electronically controlled, Ford ESC, EECIV, Bosch K,L Jetronic, Motronic are examples. These are not suitable for modification. A quick and easy check to see if your distributor has an advance mechanism is to remove the distributor cap, grasp the rotor arm firmly and try to turn it in a clockwise direction. If it allows 10 or so degrees of movement and then springs back, then it contains a centrifugal advance mechanism and is suitable for modification, if it is rock solid, don't mess with it, its mapped.
Why an engine needs more advance as its speed increases
When the compressed mixture inside a cylinder is ignited it takes time for the flame front to reach the piston and for the expanding gases to start pushing it down. The time that this takes changes according to a number of variables such as mixture strength, how well the cylinder has filled (dependent on volumetric efficiency and throttle opening), compression ratio and combustion chamber shape. Given the same circumstances of mixture strength, cylinder filling and CR, the time taken for the mixture to fully ignite and burn is the same regardless of engine speed. At increasingly higher RPM however, the time available for this burn to take place is correspondingly less, so it follows that you have to start burning the mixture earlier in order for it to push on the piston at the right time. This is the basis for increasing ignition advance.
Too much of this and the burning mixture hits the piston as it rises (pinking or pinging), too little and the flame front reaches the piston far too late and does not do a good job of pushing the piston down and the engine behaves like a herd of turtles. One of the reasons a diesel engine does not perform at higher RPM is that it has compression only ignition, so there is no way to increase the effective ignition advance.
How this is achieved
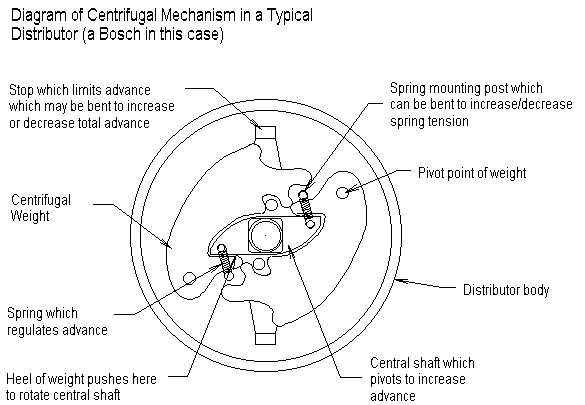
The distributor as fitted to conventional ignition systems does not just distribute the spark amongst the cylinders and switch the coil; it also contains a centrifugal mechanism that advances the ignition timing automatically as engine RPM rises. Normally there are a pair of weights within the distributor which under the affects of centrifugal force tend to be thrown outwards, this tendency is greater as RPM increases. The weights are shackled by two small springs that restrain them progressively. As the weights move outwards they exert a turning force on the top of the distributor shaft relative to the driven part of the shaft, this moves in the same direction as the distributors rotation thereby causing the points/electronic trigger to actuate earlier and advancing the ignition timing. As engine speed increases the weights overcome more of the spring's tension and advance the timing still more. There is normally a stop of some kind that limits the amount of advance that the distributor can supply. This centrifugal mechanism is usually hidden away underneath the baseplate of the distributor.
Vacuum Advance
Under conditions of light or closed throttle, the volumetric efficiency of an engine is quite poor, and cylinder filling is affected to the extent that the effective compression ratio is much lower than the static or calculated compression ratio. In these circumstances the mixture will burn much more slowly than with a fully filled cylinder and the flame front will reach the piston quite late. This can dramatically cut the overall efficiency of the engine and its economy. Under these conditions the engine will tolerate and indeed benefit from advancing the timing by up to 15 degrees over its normal setting.
The device that usually performs this trick is called the vacuum advance device. The way this works is to exploit the partial vacuum that is present in the inlet manifold when the throttle is closed or partly closed. A tube is connected from the manifold to a sealed diaphragm in the distributor, which in turn is connected to the distributors base plate. The suction deflects the diaphragm which turns the base plate against the direction of rotation of the distributor thereby advancing the timing, this gives much better throttle response on part throttle, and far better economy.
Many people who tune engines disconnect the vacuum advance mechanism, and indeed on some distributors it is very hit and miss in operation and can cause anomalies in the timing. All in all however for a road engine, the vacuum advance retard should be retained if it is possible to do so (not always easy with sidedraught carbs). This will have a dramatic affect on economy and driveability especially on small throttle openings and when 'off-cam'.
Why a modified engine requires timing changes
A standard production engine has to run acceptably well over a wide range of operating conditions, poor fuel, towing of trailers/caravans etc. and yet still deliver good economy and flexibility. Consequently the engine is tuned to give good low down performance and will use conservative timing and fuelling settings. It also has to cope with poor quality fuel and changes in altitude that can seriously affect the engines behaviour.
A tuned engine generally is not designed to give good performance below 2500-3000 RPM and indeed below this level, the volumetric efficiency of the engine is seriously affected. The more extreme the cam profile, the worse this situation becomes. This means that the effective cylinder filling at lower RPM is poorer than with a standard engine.
As explained earlier, in these conditions more ignition advance is required to overcome the slow burning of the mixture. If this advance is supplied by retaining the standard distributor and simply increasing the static timing, then the overall advance will be too high by the same number of degrees, this is obviously undesirable and can wreck your carefully modified engine. Not increasing the static advance however will lead to a very sluggish engine until quite high RPM is reached.
The engine speed at which maximum advance is reached also needs to be earlier for a tuned engine, say 3500-3800 RPM, on a standard engine maximum advance may not be reached until much later, say 4500-5000 RPM. This means that both the amount of advance, and the rate at which it is applied will not be satisfactory in a modified engine if the standard distributor is retained is unmodified condition.
Establishing static advance requirement
The static advance requirement for a modified engine is very much dependent on the duration of the cam fitted. Below is a table of advance requirements and expected idle speeds for a range of cam specifications. ON NO ACCOUNT use these settings before the maximum advance on the distributor has been correctly limited.
Cam duration Advance Idle speed expected
270
10-12 600-800
280 12-14
900-1000
290 14-16
1000-1100
300 16-18
1100-1200
310+ 18-20
1100-1400
When establishing static advance the golden rule is never use less than 10; never use more than 20 degrees. The engine may well tolerate more than 20 degrees at idle, but the moment the throttle is opened and cylinder filling is improved it will pink heavily. One problem often encountered when using more static advance than standard is that the engine may 'kick-back' when starting causing the starter to slow dramatically, this can be confused with a flattened battery or duff starter motor. You may need to compromise by the odd degree or two if your engine will not tolerate the required degrees of advance at start-up.
Static advance implies a measurement taken when the engine is stationery, however it is usually set at idle in order that any latency in the distributor drive gear is taken up. A rough setting can be made when the engine is still, but it MUST be set at 1000RPM or lower with the vacuum advance disconnected so that any latency is taken up and the centrifugal advance has not yet started its operation.
Establishing maximum advance requirement
Notwithstanding the compression ratio and other factors, the characteristic that determines the maximum advance setting is the shape of the combustion chamber and the position of the spark plug. Below is a table indicating the desired maximum advance for the various common combustion chamber shapes.
| Chamber type | Example | Max Advance |
| Semi-Hemispherical | Jaguar/Lotus Twin cam | 40-44 |
| Carotid/heart | B.L. 'A' Series,'B' series | 34-35 |
| Bathtub | Pre Xflow | 34-36 |
| Bowl in piston | Xflow | 35-37 |
| Closed | Pinto | 38-40 |
| Wedge | Imp | 36-38 |
| Open Wedge | Rover V8 | 36-38 |
| Pent-roof 4 valve | Vauxhall16v ,Zetec,Cosworth YB, K series | 30-32 |
Note how little advance a four valve, pent roofed combustion chamber needs, this is because of the very short and equal length flame paths from the centrally placed plug promoting a very fast burn. Engines with a faster burn time have a much higher RPM potential, the faster the burn, the less advance requirement, and therefore the fewer problems at high RPM. This is why Grand Prix engines have many small cylinders; these have small combustion chambers that have very fast burn times, allowing much higher RPM than engines with fewer large cylinders.
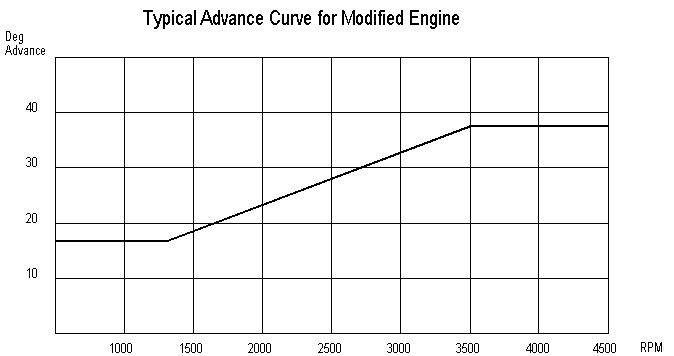
Below is a chart showing the typical and ideal advance requirements for a modified engine, the engine speed at which maximum advance should be reached is 3500-3700RPM, advance should start at around 1300RPM and be all-in by this figure
How to go about modifying your advance
Now we have established what the static and maximum advance should be, we should think a little about how we go about measuring advance, modifying the distributor and setting the timing.
First of all you cannot correctly time an engine without a strobe/timing light of some kind which is reliable, you cannot correctly time an engine without markings on the pulley to establish where the various engine positions are, E.G. Top Dead Centre (TDC) and various positions before this. The most critical position is the maximum advance setting that should NOT be exceeded.
To achieve this the engine pulley needs to be marked at TDC (most already are), at the position for desired static timing (between 10 and 20 degrees depending on cam) and at the maximum advance position. The most satisfactory method I have found is to accurately draw the pulley on a sheet of card, then using a protractor draw the appropriate marks on the circumference of the pulley template. If you have a PC, use a drawing package to accurately draw the circumference of the pulley and the degree markers rather than doing this by hand. Remember that if the engine rotates clockwise (most do) that the static and maximum advance positions will be further round the pulley in a clockwise direction from the TDC marker.
These marks need to be transferred to the engine pulley. This is most easily done by removing the pulley and marking its circumference from the template by filing a small slot or groove where each these marks need to appear. Then fill these slots on the pulley with tippex or similar white paint. You may also wish to mark the 20 and 30 degree positions, simply ensure that you can tell these apart from the other marks then refit the pulley. Make sure you check and double check where you are going to mark before doing so; do the job only once and do it correctly.
Establishing the existing advance
To begin the timing exercise you must statically time the engine at around 10 degrees BTDC. With the engine at 10 degrees BTDC on the firing stroke align the distributor so that the points are just about to open or in the case of an electronic distributor so that the stator and rotor tips are just aligning. Lock the distributor enough to stop it moving. Ensure that the vacuum advance retard is disconnected and the tube plugged. Start the engine and let it idle, adjust the timing with the engine running to 10 degrees BTDC and lock the distributor.
Now increase engine speed until it is around 5000 RPM and hold the engine steady - this ensures that all the centrifugal advance has come into operation. Use the timing light to see where the maximum advance is currently set. If it is not in line with your mark, adjust the timing carefully until it is, remember most distributors turn in a clockwise direction so you must turn it in an anti clockwise direction to advance the timing, and a clockwise direction to retard it. Ensure it is set at the maximum marker at 5000RPM and lock it into position.
Now allow the engine to idle and examine the timing again to see what setting you have for static timing, this should be easy to estimate from your markings. Write this setting down. If you then subtract this static setting from the maximum setting this will give the degrees of mechanical advance that the distributor currently supplies.
Example
Maximum setting 38 degrees, static setting 10 degrees (38-10) = 28 degrees supplied.
We have now established how much advance the current distributor gives and can move on.
Establishing mechanical advance requirement
We have our desired static and maximum advance figures already calculated, so now we can use the same simple formula to establish how much centrifugal advance we need from the distributor.
Maximum advance 38 degrees, required static advance 18 degrees (38-18) = 20 degrees required.
In our example the standard distributor is designed to give maximum advance from a starting point of say 10 degrees of static advance, if the maximum advance required is 38 degrees, then it's range is 28 degrees (38-10), this means that if the static setting is increased to 18 degrees, then the total advance will be 46 degrees (18+28), way too much. It is unlikely that the standard distributor will give the correct amount of advance, it will usually give too much. This is why we must restrict the total centrifugal advance that the distributor is capable of supplying to our new figure, in this case 20 degrees, then with the static setting of 18 degrees, the maximum advance will be 38 degrees (18+20), the correct figure.
If the advance supplied is MORE than required, and this is highly likely, it means as expected that the distributor is supplying too much mechanical advance, and that the stops in the distributor must be bent to restrict the travel of the mechanism. If the advance supplied is LESS than required which is unusual, then the distributor is supplying too little mechanical advance and the stops must be bent/filed to allow more travel of the advance mechanism.
TIP
As the distributor must now be removed from the engine it is a good idea to turn the engine to near the static timing position to assist refitting, you may also find a scribed line on the distributor body which should align with a mark in the centre of the rotor arm heel. This is also an aid to refitting.
Modifying the distributor to limit advance
To alter the amount of advance, it is necessary to remove the baseplate from the distributor to expose the centrifugal mechanism below. On some distributors, notably the Sierra one, which is a magnetic reluctance type this is a tricky and delicate operation, the rotor is held in place by a small pin in the shaft of the distributor, which must be removed before the gubbins and base plate can be removed, note carefully how the thing came apart before working on the advance mechanism. Some baseplates need turning in relation to the distributor body in order to remove them, notably the BOSCH type as fitted to Ford engines, note which way the base plate was turned and how it fits back together very carefully.
Once the baseplate has been removed grasp the drive gear/pin in one hand and turn the end of the shaft with the other (oo-er). It should be possible to establish how the centrifugal system functions and how to limit the advance. By taking in to account the current advance supplied and the desired advance, it should also be straightforward to work out how much restriction is required and then bend the stops which limit advance in the appropriate direction to achieve this.
Standard distributors have the rate of advance controlled by two springs attached to the centrifugal weights. The two springs are usually of different tension and length. Frequently the heavier of the two springs is not actually under any tension when the distributor is stationary, however the weaker of the two should have absolutely no slack when stationary. If the lighter of these two springs does have some slack, it is important to take this up so that the spring is under slight tension otherwise the timing settings will be altered immediately the engine turns over. If there is no tension in the spring, bend the stop on that spring to re-instate tension.
On some distributors that do not use stops which can be bent to change total advance it may be necessary to add material to slots or to pins. Do not be tempted to do this with materials such as araldite or filler, it will simply drop off or wear out, metal must be added, either via a dab with a MIG, or little braze. I have used small metal sleeves in the past (small pieces of tube) to increase the size of pins etc. Those of you equipped with Pinto engines have a very conventional distributor that uses stops that can be bent very easily.
After the advance has been limited it is time to refit the distributor and retime the engine as detailed previously. Hopefully the required advance will now have been obtained, if not then repeat the procedure above until the total advance on the distributor is correct. This can be a little tedious if it needs several goes to get this right, PERSEVERE; it is well worth doing.
TIP
When fitting the distributor it is often quite difficult to get the drive teeth/oil pump drive etc. to line up correctly, it is sometimes a good idea to turn the engine over slightly by hand backwards or forwards until the various drives engage, then the engine can be turned back to the static setting again.
Establishing the Correct rate of Advance
In most applications for performance engines, the heavier of the two distributor springs requires replacement with a lighter spring. Alternative springs can be gleaned from a scrap distributor (it does not need to be of the same type necessarily) from a breakers yard. This is necessary to give a faster advance ramp, as seen in the previous table.
When the heavy spring is replaced by a lighter one, BOTH springs must be under tension, but not under too much, there must be no loose rotational movement between the central shaft and the weights as this will give too fast a ramp and lead to pinking. The static timing, if set as before is plenty, and we do not want any more until around 1300-1500RPM. If the distributor does not have bendable posts that allow the spring tension to be varied, then the springs may need to be tweaked a little to shorten or lengthen them.
Once you have substituted a weaker spring for the stronger one, it is time to check the rate of advance. Re-assemble and refit the distributor, and set the static timing to the required amount of advance. Set the idle at between 900-1000RPM. Hold the engine at 1000, 1500, 2000, 2500, 3000 and 3500RPM and note the amount of advance at each RPM. If maximum advance is not reached at 3500RPM, gradually increase the RPM until maximum advance is reached and note the RPM. This is usually a two-man operation.
Plot the rate of advance on some squared paper, alongside the ideal advance ramp shown in the previous table. If the advance springs are too weak then maximum advance will occur at considerably less than the 3500RPM ideal setting. If the springs are too strong then maximum advance will occur well beyond this setting. To be safe, the springs should prevent maximum advance being reached before 3500RPM.
If the advance ramp starts before 1300RPM, then this indicates that the initial tension on the springs is insufficient, so it will be necessary to bend the posts to increase initial spring tension. By bending posts to increase or decrease initial tension it should be possible to make the advance ramp very close to the ideal which is a steady increase in advance between 1300RPM and 3500RPM. The highest acceptable RPM at which maximum advance should be reached is 4000RPM, the lowest is 3200RPM. Do not exceed these limits.
When you are happy that the rate of advance is near to the ideal (this will be after some trial and error) it is time to road test the car. Try accelerating in each gear from around 1500RPM and see if the engine pinks (pings), if it does note the engine speed at which this is happening, and double check the advance at this speed. It may be necessary to increase the spring tension a little to restrict advance at this engine RPM.
Most engines will pink a little if given unreasonably low RPM and a high loading, so if this only happens at 1500RPM in a high gear, this is an unusual combination and is unlikely to be encountered in normal driving. When the rate of advance is correctly set it should give the engine a rock solid idle, strong progression and mid range performance.
Well.. That's all there is to it.
If you have properly followed the procedures outlined in the previous text, then the advance curve for your modified engine should be very close to ideal and you should be able to feel the difference in your engines performance. If you are in doubt, exercise caution, better too little advance and slightly tardy performance, than too much and a ruined engine.
Points type distributors
If you are using an early distributor that uses points, you are probably aware of the problems that can be caused, points bounce, arcing at the points, timing scatter. As the points wear, the timing tends to retard significantly, and the dwell setting goes all to hell.
As a replacement for points I can strongly recommend the IGNITOR unit that can be bought from Aldon Automotive, Europa or Demon Tweeks, this is a completely self contained electronic ignition trigger (Hall effect) and amplifier all in a single unit that fits neatly inside the distributor as a direct replacement for the points. It requires no black boxes, or separate amplifier, and only requires a power feed from the plus side of the coil to be fed into the distributor with the switch wire. Because it is a rotary device it is not affected by clapped out distributor bearings either. It is also ideal for classic cars where its self contained design renders it undetectable from outside the distributor. Fit this unit and forget it, it requires no maintenance and is ultra reliable. It is relatively inexpensive compared to normal electronic ignition systems such as Lumenition.
I used an IGNITOR on my old Pinto engine that used to eat points. The starting was much improved and the timing stayed perfectly set for many thousands of miles.
Dave Andrews